Healthier Chocolate Nut Spread

chocolate hazelnut spread

You asked for a healthier alternative to the famous (and delicious) chocolate hazelnut spread (you know which one). Today I'm sharing not just one, but 4 alternatives. All are much lower in sugar and have no palm oil. Just in time for back-to-school. I mention back-to-school because you'll not only be looking for packed lunch ideas, but also breakfast ideas for rushed mornings and quick after school snack ideas.

All of these contain nuts or seeds. That's the foundation of this foodstuff afterall. Some preschools and schools are nut and seed-free, some are nut-free (i.e. seeds are okay), and some are peanut-free (i.e. nuts and seeds are okay). Always check with your individual facility to find out exactly what is and what isn't allowed.

An important note, especially if you are introducing these to picky eaters who already are familiar with the famous chocolate hazelnut spread, none of these taste exactly the same. So, don't try to pull a fast one on your little one and swap one for the other. They'll notice the difference - kids have keen observation skills with their food. Call this spread by a different name. This way they will be expecting something different.

A huge THANK YOU to student volunteer Carla for her help with these recipes!

Enjoy!

nutfree chocolate spread

Healthy Nut-Free Chocolate Spread

Ingredients:

  • 2 cups toasted sunflower seeds
  • ½ cup cocoa powder
  • 4 tbsp icing sugar
  • 1/2 cup milk (optional)
  • ¼ to ½ cup canola oil

Directions:

  1. In a pan over medium-high heat, toast the sunflower seeds until light brown and fragrant, about 3-4 minutes. Set aside to cool.
  2. Using a food processor, process the sunflower seeds until powdery. Scrape the sides.
  3. Add the cocoa powder, icing sugar, milk (optional), and canola oil. Blend until smooth.

Homemade Chocolate Hazelnut Spread

Ingredients:

  • 2 cups hazelnuts
  • 3 tbsp icing sugar
  • ½ cup milk (optional)
  • ½ cup cocoa powder
  • ¼ to ½ cup canola oil

Directions:

  1. In a pan over medium-high heat, toast the whole hazelnuts with their peels on for 5 minutes. Set aside to cool.
  2. Once the whole hazelnuts are cool, rub them in between a kitchen towel to loosen and remove the skin.
chocolate spreads_medmed

Habibi's Chocolate Tahini and Powerplant's Chocolate Sprouted Seed Spread

(Note: In the spirit of being fully transparent, both of these were given to me for free. I did not receive payment to review either. I'm super picky about what foods I'll share with you in my reviews.)

I brought both of these to my co-working space last week so that everyone could try them. Yes, there are perks to having dietitians as friends and co-workers! Both received very positive reviews. Some people preferred one and an equal number preferred the other. Both products have a short ingredient list with only recognizable foods. They're made with nuts or seeds, providing healthy fats (and no palm oil). Each has just a touch of sugar/sweetener. Check each product's websites for a listing of what stores you can find them in.

Powerplant's spread has an intense chocolate taste for you dark chocolate lovers. It has a chunkier texture but smooth mouthfeel. So it's perfect for spreading on a cracker but not on soft bread. It totally screams to be included in your next smoothie.

Habibi's Chocolate Tahini has a milder chocolate taste. A few people found the tahini and chocolate flavours fought eath other. Most of us thought it was delicious (me included). This spread is the more classically kid-friendly of the two.

Looking for more healthy, kid-friendly recipes? Check out my recipe page.

5th Annual Homemade Ice Pop Recipes

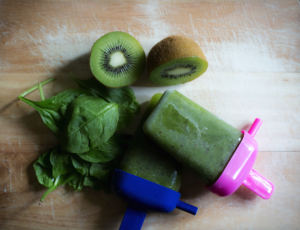
spinach-kiwi ice pop

It's back, my annual home-made ice pop recipe collection. Some may call these homemade popsicles or paletas. Or, frozen smoothies. Whatever you call them they're a delicious summer treat. I want to give a big shout out to Carla, the dietetic student who is volunteering with me for creating these recipes. My directions for her: the recipes need to be simple, include no added sugar, include fruit and even veggies, and only include easy-to-find ingredients. Oh, and of course, that they needed to be delicious. She sure delivered.

The directions for each recipe are the same:

  1. Combine all ingredients in a blender.
  2. Blend until smooth.
  3. Pour into molds.
  4. Freeze.

Enjoy her work!

Kristen

P.S. For more delicious, healthy frozen recipes, check out these links:

Spinach Kiwi

Inspired by: http://www.kiipfit.com/spinach-kiwi-popsicles/

Packed with fruit and leafy greens, the vibrant green color of these popsicles comes from blending both kiwi and spinach.

  • 1/3 cup spinach
  • 1  kiwi
  • 2 drops lemon juice
  • 1/3 cup water

Mango Lassi

mango lassi ice pop

Inspired by: http://revisfoodography.com/2015/04/mango-lassi/

Inspired from a classic Indian cold drink, mango lassi is a blend of yogurt, fruit and spice. Not a fan of cardamom? Simply omit the spice and you can still enjoy it as a mango-yogurt blend.

  • 1 mango
  • 160 ml greek yogurt
  • 1 small pinch cardamom (to taste)

Cantaloupe

cantaloupe ice pop

This very simple and refreshing recipe allows you to use ripe or extra ripe cantaloupes. No added sugar necessary.

  • ¾ cup cantaloupe
  • ¼ cup water

Get more healthy home-made ice pop recipes here:

5th Annual Healthy Home-Made Popsicles (ice pops, paletas)

4th Annual Healthy Home-Made Popsicles (ice pops, paletas)

My Least Popular (But Very Effective) Picky Eater Tip

picky-eater-tip

I’ve been doing workshops for parents on picky eating for 8 years now. At every single picky eater seminar there is one strategy that always causes resistance with the parents in the audience. I continue to share it because it’s a very powerful strategy for minimizing picky eating. Yet I can almost hear the thud it makes when I describe it and it lands on the floor. The problem for which it’s a solution? How to get kids (particularly toddlers and preschoolers) to stay at the table for meals. It’s the solution for meals that go on and on forever because your child sits down, takes one bite, then pops up from the table to do something terribly important, then returns to the table, takes another bite, pops up from the table (and so on and so on).

So, what’s this successful, but unpopular strategy? Create a rule that all meals and snacks are eaten when sitting down. In other words: Stop. Eat. Then Continue On. Yes, I do mean snacks too. You may wonder why I continue to share this strategy knowing that it’ll be so unpopular. I share it because it really is successful for supporting kids to do a good job of eating. If we allow the common practice of letting kids eat snacks “on the run”, i.e. while in the car, in the stroller, you chasing them around the house spooning bite after bite into their mouths, we’re teaching kids that there is an alternative to sitting still at a table to eat. As seen through a toddler’s or preschooler’s eyes:

Why is it that sometimes can I eat while playing. But other times I’m told that I have to stop playing and sit at a table to eat (which is bo-ring).”

Create the expectation that all meals and snacks are eaten sitting down. In families who set this expectation, kids come to the table when called. They eat. Then, they continue on with their day (i.e. go back to playing). Meals and snack go much more smoothly and are less stressful because the kids aren’t constantly getting up from the table.

I understand the initial resistance that you may have to this strategy. In our super busy lives, how are we supposed to carve out time to stop and eat snacks? And it seems like I’m saying that you can never leave the house again, because you always need to be home to give snacks. Not true. Let me clarify.

Does this mean that you never get to leave the house again? No. In the summer this is especially easy. Stop at the park bench, picnic table, or spread out a blanket and enjoy a snack. Use similar ingenuity at indoor locations. For example, you can stop at the bench in the recreation centre foyer or use a table at the food court at the mall.

The important point is to stop. Don’t feed your child in the stroller, car seat, etc. And, don’t hand out a snack while your child continues playing. I know that it’s tempting to do so in our busy lives. But, it sets you up for more battles at meals and snacks. What seems like an efficient use of time in the immediate, actually costs you more time in the long run. In families who establish the stop-to-eat expectation, meals and snacks are very quick. And, they are much more pleasant. When it’s meal and snack time the kids simply get down to the business of eating.

Simply put: Stop. Eat. Then, continue on.

Get more successful picky eater tips. Sign-up for my e-newsletter today.

Peanut Banana Chocolate Ganache Bites

YAY! It's my annual chocolate recipe. Perfectly timed for Valentine's Day.

If you're new to following me you might wonder why a dietitian is sharing a chocolate recipe. Quite simply, because food is more than just fuel for our bodies. Food feeds our minds and soul too. Denying ourselves the pleasure of food isn't healthy.

This recipe is super simple to make. And WOW is it decadent. Like the middle of a truffle without that pesky shell. I first made experimented by making this in regular-sized muffin tins and it was simply too much (and believe you me, it takes a lot of rich chocolate to make me come to that conclusion!). Mini muffin tins make the perfect size. Just like those 2 bite brownies, but healthier for you and more decadently delicious.

These really are for dark chocolate lovers. So they may be more of an adult treat. But you never know. Make them with your kids and see what their verdict is.

The inspiration for this recipe was from chocolatecoveredkatie.com

If you follow these lifestyles, you'll be happy to know that these heavenly bites are vegan, paleo, gluten-free and have no added sugar.

You can easily make them peanut-free by omitting the peanuts. Go completely nut-free (note: they do contain coconut) or substitute pistachios, chopped almond, or hazelnuts for the topping.

Peanut Banana Chocolate Ganache Bites Ingredients

4 TBSP coconut butter (Note: This isn't the same as coconut oil. Also, if your jar of coconut butter has separated, scrape off the oil and use the lower level - the coconut butter)

1 ripe banana

3 TBSP cocoa powder

3 small pinches salt

4 TBSP unsalted peanuts

Peanut Banana Chocolate Ganache Bites Directions

This recipe happens really quickly so you'll want to prepare all your ingredients before you start cooking.

  1. On a small plate, mash the banana really well.

  2. Chop peanuts.

  3. In a small saucepan over medium heat, melt the coconut butter, stirring constantly.

  4. Add the mashed banana. Stir constantly until completely combined.

  5. Lower heat. Add cocoa powder and 1 pinch of salt. Mix well and remove from the heat.

  6. Moving quickly, spoon into a mini muffin tin. Be careful, the mixture is very hot.

  7. Top with chopped peanuts and sprinkle with salt.

  8. Freeze for 1 hour.

  9. Enjoy!

Note: The ganache bites are at the absolute perfect texture when eaten after freezing for 1 hour. If you make them ahead of time and freeze for longer, remove them from the freezer and warm them to room temperature for at least 30 minutes (otherwise they'll be rock hard).

Check out these other healthy chocolate recipes:

Chocolate Chia Pudding

Chocolate Nut Spread

Mint Chocolate Whip

Roasted Chickpeas - 4 Ways

It's official - 2016 is the year of the pulse! Pulses, such as chickpeas, are high in vegan-source protein, high in fibre, low-glyemic carbs, and contain lot of other nutrients. Did you know that we grow lots of them in Canada? Roasted chickpeas are a delicious way to eat more pulses. My friend Margie Barnard, a fantastic cook (we're talking Four Seasons Hotel), and I developed these recipes. We each had our favourites, so I’m sharing all four. The steps are the same for all of them.

Whole chickpeas are a choking hazard for little ones, so this is a good snack idea for kids 3 years and up (and us kids at heart).

Roasted Chickpeas Directions

  1. Drain and rinse the chickpeas.

  2. Pat dry the chickpeas until well dried (otherwise they’ll be mushy).

  3. Combine all the other ingredients in a medium-size bowl.

  4. Toss the chickpeas into the mixture. Coating the chickpeas well.

  5. Line a cookie sheet with parchment paper. Spread the coated chickpeas onto the parchment paper-lined sheet.

  6. We played around with the oven temperatures while they were cooking so I’m afraid that I don’t have exact temperatures and times for you. We started at 400 degrees for the first while, then stirred the chickpeas and reduced the oven temperature to 350 degrees. Keep a close eye on them while they bake. You’re looking for them to turn a golden brown colour. And, when you taste them, they have a crunchy shell and are soft in the middle. The recipes containing honey turned the darkest colour, the fastest.

  7. Allow to cool, then ENJOY!

Savoury Roasted Chickpeas

15oz can chickpeas

1/2 tsp garlic powder

1/2 tsp ground cumin

1/4 tsp salt

1/4 tsp pepper

2 Tbsp olive oil

Garam Masala Roasted Chickpeas

15oz can chickpeas

1 tsp garam masala

1/4 tsp salt

2 Tbsp olive oil

Honey Roasted Chickpeas

15oz can chickpeas

2 Tbsp honey

1 tsp sugar

1 tsp cinnamon

Sweet & Salty Roasted Chickpeas

15oz can chickpeas

2 Tbsp honey

1 tsp canola oil

1/4 tsp salt

See more healthy, delicious recipes.

Nutrition Game Changer: Eating Protein at Afternoon Snack

protein at afternoon snack

Something that I recommend for almost all of the women whom I’ve worked with is eating protein at afternoon snack. Why is this a nutrition game changer? Because in my experience, it helps with a lot of the problems that women come to me for help with regarding their eating in the afternoon and evening. Do any of these scenarios sound familiar?

  • Cravings for junk food in the late afternoon.
  • Energy crashing at about 4pm.
  • Constant nibbling while you’re cooking.
  • Getting too hungry to last until you can actually make dinner so instead you pick up take out/ go through a drive-through/ eat out.

If so, then eating protein at an afternoon snack is worth trying. Here’s why:

Human beings digest a meal and get hungry again in about 4 hours. As our blood sugar drops, our body sends signals to us that we’re hungry. If we don’t respond by eating something that subsequently raises our blood sugar, our bodies send more and more urgent messages. Messages that drive us towards the high sugar, fat, salt, very tasty foods. It’s what the feeling of ‘hangry’ is all about.

Assuming that you’ve eaten lunch at about noon, it’s natural that you start to feel hungry again at about 4pm. The food choices that you make at lunch will impact how long you last before you start to get hungry. Some choices will mean that you will feel hungry again in less than 4 hours. But that’s the topic of a whole different blog post J

The longer that you wait until you eat again, the more your body will drive you towards those high sugar, fat, salt, very tasty foods. It’s a physiological drive, not a lack of will power, that causes you to eat those foods before dinner.

The secret to making healthy food choices in the afternoon and evening is to prevent ‘hangry’ by having an afternoon snack. Including protein at your afternoon snack can help your body digest your snack more slowly, thus causing more even blood sugar and fewer cravings for junk foods.

Pair your protein food with some veggies and/or fruits for a perfect combination of nutrients. Examples include:

  • A piece of fruit and a small handful of nuts.
  • Raw veggies with white bean dip.
  • Chia coconut pudding topped with fruit.
  • Collard leaf wrapped around sliced hard boiled egg and bell peppers.
  • Plain Greek yogurt topped with fresh or dried fruit.
  • Apple slices or a banana dipped in nut butter (e.g. peanut butter, almond butter).
  • Protein powder smoothie made with fresh or frozen fruit and leafy greens (e.g. spinach).

Eat protein at your afternoon snack. It’s a nutrition game changer for preventing craving junk food in the late afternoon. And, it’ll help buy you enough time to make a healthy dinner before ‘hangry’ hits.

What's your favourite afternoon snack that includes protein? Share it in a comment below!

Curious about how I can help you achieve your health and nutrition goals? Schedule a (free) call to find out.

Healthy Kids Snack - Banana Roll Ups

healthy kids snack banana roll ups

Sometimes the classics are a classic for a reason. Bananas and peanut butter simply taste great together. Here's a fun way to bring this classic duo together in a healthy kids snack. I'm choosing to share it today because it's easy for young hands to manage. Perfect if you're gearing up to pack snacks or a lunch for little ones with back-to-school next week. This works well with peanut butter, other nut butters (e.g. almond butter) and the non-nut butters if your child attends a nut-free facility.

Hey, it's also a delicious idea for those of us who are young at heart :)

Banana Roll-Ups Ingredients 2 small tortilla wraps, whole wheat ¾ medium banana 1 tbsp natural peanut butter, nut butter or non-nut butter ½ tsp honey (optional) 1 dash cinnamon, ground

Banana Roll-Ups Directions

  1. Slice banana.
  2. Spread nut butter or non-nut butter on wraps.
  3. Top with bananas.
  4. Drizzle honey and add a dash of cinnamon.
  5. Roll (pack in lunch boxes) and enjoy.

Get more healthy, simple, kid-friendly recipes.

Nutrition Game Changer: Hemp Hearts

hemp hearts

Recently I had a client who asked me for my nutrition game changers. She was looking for foods or habits that have made a big impact on the nutritional health of clients I’ve worked with. And, in my life too. Some may call these nutrition hacks. But I'm not a fan of that phrase.What a cool concept. Thank you Alison for asking me the question! I liked Alison’s idea so much that I’ve decided to share these ideas with you too. Starting today, once a month, I’ll be sharing with you my nutrition game changers. It might be a food (like today) or it might be a simple habit that can make a big impact in your health. I hope that you enjoy this new idea! It was easy to decide what my first nutrition game changer would be. I first started eating hemp seeds (a.k.a. hemp hearts) myself. Loving them, I’ve now introduced them to almost every client whom I work with.

Hemp Hearts: Why Do I Love Them?

Hemp hearts are a great source of plant-based protein and healthy omega-3 fat. Their mild taste, tiny size, and softer texture mean that they are less noticeable than other nuts when you add them to dishes, lending themselves well to many uses.

And, they’re grown in the Canadian prairies. So, they’re a more local choice than many nuts and seeds.

Help Hearts: How to Eat Them

These are the two most common ways that I recommend including hemp hearts:

  1. Hemp seeds are a great way to include protein at breakfast. As you can see in the picture, I add them to my overnight oats. Sprinkle them on your cereal or blend them into smoothies. Do you head out the door without eating breakfast? How about wolfing down 1 – 2 TBSP of these and a piece of fruit? It’s a healthy breakfast without taking the time to prepare anything.
  1. Add them to plain yogurt and fruit as a protein boost to your afternoon snack. Their healthy fats will also help keep your blood sugar stable and likely keep you full longer (and less likely to hit up the vending machine for junk foods).

Extra Tips:

Want to give them a try without committing to a big bag? Keep an eye open for the individual serving packages (like the ones I have in the picture). Or, browse the bulk food section at your local grocery or health food store.

Store your hemp seeds in the fridge. Like all nuts and seeds, this will keep the fats fresh and they’ll taste better.

Curious about how I can help you achieve your health and nutrition goals? Schedule a (free) call to find out.

Banana Ice Cream (Dairy and Sugar Free)

banana ice cream

I wish that I had discovered this recipe earlier in my life. It’s creamy, smooth and delicious – just like ice cream! Banana ice cream.

While it’s vegan and sugar-free, the best thing about this recipe (besides the taste) is that it only includes 1 or 2 ingredients. How great is that!

The secret is very ripe bananas. Buy them when you see them in the store. Slice and freeze them. Then you’re ready to make ice cream anytime you wish.

Blending the bananas does take a little while. At first they will break into a chunky slurry and you will likely think that this “ice cream” idea doesn’t work. Be patient. Next it will form one big ball. Then, suddenly, it will become a beautiful, smooth, whipped texture – just like ice cream. If you haven’t added any strongly coloured flavourings, the colour of your bananas will also suddenly lighten considerably to a creamy off-white. That’s what you’re looking for – your “ice cream” is ready!

There are likely hundreds of flavor combinations. I’m sharing the plain version (so you know the base recipe) along with 3 flavour ideas. My favourite is the cinnamon.

Banana Ice Cream Directions

  1. Peel and slice bananas. Freeze.
  2. Place frozen sliced bananas in a blender. Add flavouring ingredients. Blend until smooth.

Banana Ice Cream Ingredients

Plain

1 cup              sliced bananas

Cinnamon

1 cup              sliced bananas

¼ tsp              cinnamon

Chocolate

1 cup              sliced bananas

½ - 1 tsp        cocoa

Half a teaspoon of cocoa results in a banana ice cream with just a hint of chocolate. One teaspoon gives a full chocolate flavour. Choose a level that you enjoy.

Strawberry

2/3 cup          sliced bananas

1/3 cup          strawberries

This combination works best if you partially blend the bananas first until they are just about to start creaming. Then add the strawberries. The result will be a creamy ice cream with strawberry flavour. Adding the strawberries at the same time as the bananas results in a more icy rather than creamy texture (more sorbet-like rather than ice cream-like).

Check out more healthy recipes.

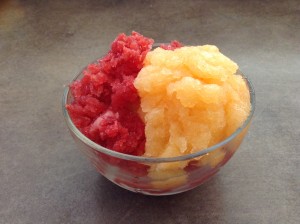
Fresh Fruit Granitas

Fresh Fruit Granitas

Similar to a slushie but made with real fruit, granitas are super refreshing in the summer heat.

They’re easy to prepare. The only tricky thing is to plan ahead so that you’re home and you remember to break up the ice crystals every hour (I set the alarm on my phone to remind me).

Kids can help measure ingredients, push the buttons on the blender, and scrape the ice crystals.

The fruit flavor is strong in granitas. The recipes here are listed from the most mild to the strongest. If your little ones prefer mild flavours, stick to the melon granitas. The kiwi granita is so strong that it almost made my eyes water (which I enjoyed on a hot afternoon).

Fresh Fruit Granitas - Directions

The steps are the same for all the recipes:

  1. In a saucepan, combine sugar and water.
  2. Bring sugar water to a boil until the sugar is well dissolved.
  3. Remove from the heat and let cool for 10 minutes.
  4. In a blender, combine the fruit (removed from it’s peel and pits), fruit juice (or other liquid), and sugar water.
  5. Pour into a non-metal baking dish, such as a glass lasagna pan.
  6. Place in the freezer. Freeze for 1 hour.
  7. Remove from the freezer and scrape thoroughly with a fork, breaking up the ice crystals.
  8. Return to the freezer for 1 hour. Again, remove from the freezer and break up the ice crystals with a fork. Repeat at least 2 more times.

Fresh Fruit Granitas - Recipes

Cantaloupe

Adapted from: http://www.whiskaffair.com/2013/03/cantaloupe-lemon-and-mint-granita.html

1                      cantaloupe

1/4 cup          sugar

¼ cup             water

4 TBSP            fresh lemon juice

Raspberry-Watermelon

Adapted from: http://whipperberry.com/2013/06/raspberry-watermelon-granita.html

5 cups             cubed, de-seeded watermelon

2.5 cups          raspberries

½ cup             sugar

½ cup             cran-raspberry juice cocktail

(Combine sugar and cran-raspberry juice cocktail in saucepan.)

Pineapple-Mango

Adapted from: http://www.muybuenocookbook.com/2013/03/pineapple-and-mango-granita-blendtec-giveaway/

Juice from 2 limes

1/3 cup          sugar

1                      pineapple, peeled, cored and diced

2                      mangos, peeled, pitted, and diced

(There’s no heating the sugar in this recipe. Simply combine all ingredients in a blender.)

Kiwi

Adapted from: http://dhaleb.com/2010/03/

5                    kiwis

½ cup           sugar

½ cup           water

1 cup              club soda

2 teaspoons   lime juice

See more delicious, healthy recipes here.

Nuts: Why You Want More Than Just Almonds

Nuts: Why You Want More Than Just Almonds

Have you taken the healthy step of including nuts in your daily eating habits? Perhaps you’re eating nuts because of their healthy fats. Or, because you’re eating a more clean, plant-based diet. Or, because they make a great protein-rich snack that doesn’t need to be refrigerated. Whatever your reason, nuts certainly are a healthy food to include regularly. When I work with clients, I look to have them eat nuts and seeds frequently. The good news is that word about how healthy nuts are seems to be getting out to people. Most clients I see are eating nuts several times a week. However for a large number of clients, eating nuts equals almonds. Only almonds. It may be whole almonds, almond butter and/or almond milk, but the only nut or seed that they’re eating is almonds. This is a problem.

If almonds are the only nuts that you eat, now’s the time to expand your repertoire to include different nuts and seeds. Here’s why:

Variety is Better Than Any 1 Food: We humans are omnivores. Your body is designed to eat a wide variety of foods. Yet, so many people eat the same few foods over and over again. Nuts and seeds are all different. Some have more healthy fats, some have more protein, and they vary in the amount of minerals and other nutrients. By sticking to only one or two nuts/seeds you are missing out on many of the benefits of different nuts/ seeds. And, when you eat a lot of only a few foods, you can get too much of some nutrients.

California Drought: Most of our almonds come from California. Did you know that California has been experiencing a drought for years? And, that their ground water is decreasing fast. Did you also know that almonds trees take a large amount of water? It’s not a good combination.

Before you throw the baby out with the bathwater (I hate that saying, do you know of a less violent one that expresses the same meaning?), please note that I’m not saying to never eat almonds again. What I’m saying is that considering that eating a variety of foods is a healthier choice, now’s a good time to take the pressure off of California water sources by expanding your nut and seed repertoire. Enjoy almonds amongst a wide variety of nuts and seeds.

There’s a whole world of nuts and seeds out there. Explore it. I do - half a shelf of my fridge is taken up with nuts and seeds. And yes, you want to store them in the fridge to keep them from going rancid.

Here’s some ideas of nut and seeds to check out. Alternatively a trip to your local bulk food section can inspire you.

  • Macadamias
  • Cashews
  • Peanuts
  • Walnuts
  • Hazelnuts (Get these while you can. There’s a blight wiping out all the trees in North America).
  • Pine nuts
  • Pecans
  • Chestnuts
  • Brazil nuts
  • Pistachios
  • Sesame seeds/ tahini
  • Flax seeds
  • Hemp seeds/ hearts
  • Chia seeds
  • Pumpkin seeds/ pepitas

Curious about how I can help you achieve your health and nutrition goals? Schedule a (free) call to find out.

The Perfect Afternoon Snack (for Adults)

The Perfect Afternoon Snack (for Adults)

It’s not just kids who need snacks. We adults need them too. Today I'm sharing the perfect afternoon snack for us adults. Why? It takes approximately four hours to digest food and start getting hungry again. Planning a healthy snack between lunch and dinner can prevent that late afternoon hungry-angry feeling (commonly called ‘hangry’). ‘Hangry’ is created by low blood sugar. Your low blood sugar will also cause you to search out (i.e. crave) sugary, fatty, salty foods. It’s a natural reaction, not a lack of will power.

The secret to healthy eating is prevention. Prevent becoming ‘hangry’ (and heading straight to the convenience store for processed foods) by planning a healthy snack before you get to that point.

So what’s the perfect snack? In truth, there isn’t just one perfect snack – one size doesn’t fit all when it comes to nutrition. Here are the elements of three styles of snacks. One of which will likely be the perfect fit for you.

The Perfect Snack Option 1: Just Produce

This is best if you have a relatively short time between lunch and dinner. Or, if you are very sedentary and don’t need any more calories from a larger snack. A piece of fruit or some raw veggies may be just enough to tie you over for about an hour until dinner.

The Perfect Snack Option 2: Produce + Protein

This more substantial snack provides both some quicker energy from the fruit and veggies and some longer, slower burning energy to keep you going for a few hours. This is my personal mid-afternoon snack. Here are some fantastic combinations to use as inspiration:

  • Strawberries and edamame
  • Carrot sticks/ baby carrots and hummus
  • Apple slices spread with almond butter

The Perfect Snack Option 3: Produce + Protein + Whole Carbs

This option is so substantial that it’s practically a mini-meal. Most of us don’t need this much food at snack time. But if you’re very active and/or in your young 20’s, it might be a good fit for you. Some ideas for inspiration:

  • Smashed avocado on rye crackers with a handful of cashews
  • Natural peanut butter and banana sandwich made on sprouted grain bread.

Curious about how I can help you achieve your health and nutrition goals? Schedule a (free) call to find out.

Baked Avocado Eggs

Baked avocado egg

I'm a long-time lover of avocados and so I'm excited to see that many others have realized how delicious they are. And, that their healthy fat is not something of which to be afraid. Browsing around Pinterest for some cooking inspiration (I love Pinterest), I found this recipe. I like to give credit where credit is due, so here's the original recipe: http://www.popsugar.com/fitness/Baked-Eggs-Avocado-Recipe-30787252 This baked avocado egg recipe has all the creamy deliciousness of an eggs benny - without all the work of Hollandaise sauce. In other words, it's a perfect recipe for Easter breakfast. Finger Food Version: Cook a few minutes longer until both the whites and yolk are set (it's recommended that babies under 12 months don't have runny egg yolks). Cut the egg and avocado into finger-food size pieces. Or, spread on long, skinny pieces of toast.

Baked Avocado Egg Ingredients:

1 avocado

2 eggs

salt & pepper

Optional: toast

Baked Avocado Egg Directions:

  1. Preheat the oven to 425 degrees.
  2. Slice the avocados in half. Remove the pit. Scoop out enough flesh from the avocado,  so the egg will fit in the centre. Reserve this flesh for another recipe/snack.
  3. Slice a small piece off the back of the avocado halves so that they will sit flat without rolling around. Place the avocados in a small baking dish, making sure they fit tightly. If your dish is too big, scrunch up a piece of tin foil to fill the space.
  4. Season the avocado halves with salt and pepper. Crack an egg into each avocado half.
  5. Place in the oven and bake for 15 to 20 minutes. Cooking time will depend on the size of your eggs and avocados. And, how you like our eggs cooked.
  6. Enjoy scooped directly out of the avocados. Or, spread on top of toast.

Check out more healthy, delicious recipes here.

Chocolate Fruit and Nut Bark

chocolate bark_medmed

I'm frequently asked for healthy treat recipes. With Valentine's Day around the corner, I figured that today was the perfect time to share an idea for a healthy (and delicious) chocolate fruit and nut bark.

Like many of the food ideas that I share, this is more of a technique than a recipe. Pick and choose the dried fruit and nuts that you want to use. Add more or less chocolate. Once you get the hang of this you'll wonder why you've been eating cheap chocolate bars!

The healthiest options are raw (non-roasted, unsalted) nuts, unsweetened, unsulfured dried fruit, and dark chocolate with at least 70% cocoa.

Note: Chocolate does best when allowed to cool slowly. Make this the night before you want to eat it!

Chocolate Fruit and Nut Bark Ingredients

1.5 cups nuts (e.g. hazelnuts, cashews, peanuts, almonds, pistachios)

1.5 cups dried fruit (e.g. raisins, goji berries, mango, apricots)

400g chocolate (NOT semisweet baking chocolate)

Chocolate Fruit and Nut Bark Directions

  1. Chop larger fruit and nuts into bite-size pieces.
  2. Spread evenly over a parchment-lined baking sheet.
  3. Chop the chocolate.
  4. In a medium-size pot, bring 2 cups of water to a boil. Turn off the heat.
  5. Place the chopped chocolate in a large, heatproof (i.e. not plastic) bowl. Place the bowl over the boiling water. Using a spatula, stir the chocolate until it melts.
  6. Pour the chocolate over the fruit & nut mixture.
  7. Allow the bark to cool to room temperature. Then, refrigerate overnight.
  8. Cut into pieces and enjoy!

In this photo I'm testing out different fruit and nut combinations. It's a tough job but someone has to do it!

Matches made in heaven: hazelnuts and dried mango, cashews and goji berries, salted peanuts and raisins, almonds and golden raisins, pistachios and apricots.

Get more healthy recipes here.

Healthy Valentine's Day treat: Chocolate, fruit and nut bark.

Kids' Bedtime Snacks – Do or Don’t?

sleep Rarely do I complete a workshop without a parent asking me about kids' bedtime snacks – are they a ‘do’ or a ‘don’t’?

In short – either option can work. But, you must make a choice. And, there are common pitfalls that you want to avoid. Otherwise, kids' bedtime snacks can actually contribute to them not eating well at dinner. And, contribute to kids not meeting their nutrition needs.

Often I see families only offering their kids bedtime snacks when their picky eater doesn’t eat well at dinner. This is the ‘don’t’. It’s a ‘don’t’ because it tends to backfire. Kids quickly figure out that if they don’t eat at dinner (where they usually are presented with more challenging foods), they can get a bedtime snack only a short while later that includes favourite foods.

Unfortunately, you’re reinforcing the behavior that you don’t want. You’re inadvertently rewarding kids for not eating their dinner.

Instead, make a new family rule – choose either:

  1. There is always a kids bedtime snack
  2. There is never a kids bedtime snack

If you choose to never have bedtime snacks, kids will quickly learn that if they choose to not eat at dinner, they’ll need to wait until breakfast the next day to eat again.

If you choose that there is always a bedtime snack, make sure that there is at least 1 hour between dinner and bedtime snack. And, at bedtime snack offer foods from 2 – 4 food groups. Sometimes choose to offer favourite foods. And, sometimes choose to offer a challenging food.

Oh, and brush teeth after bedtime snack.

Check out my book for more shttps://providetrustlove.com/bookuccessful tips for picky eater toddlers and preschoolers.